本文最后更新于 2025-01-10T22:20:33+08:00
说明:
- 本文档由DuRuofu撰写,由DuRuofu负责解释及执行。
- 本文档为了记录Vue-Element-Admin-Template的搭建过程。
修订历史:
| 文档名称 |
版本 |
作者 |
时间 |
备注 |
| Vue-Element-Admin-Template搭建记录 |
v1.0.0 |
DuRuofu |
2024-01-18 |
首次建立 |
|
|
|
|
|
Vue-Element-Admin-Template搭建记录
一、 技术栈
二、基础搭建
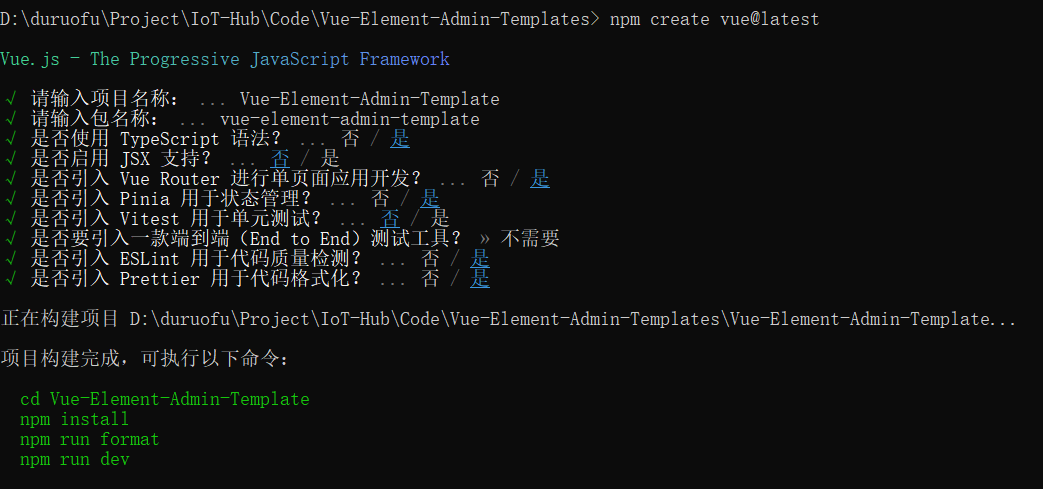
2.1 初始化项目
npm create vue@latest

eslint 和 prettier在生成项目时已经配置好了,后面不再提及
2.2 目录结构
1
2
3
4
5
6
7
8
9
10
11
12
13
14
15
16
17
18
19
20
21
22
23
24
25
26
27
28
29
30
31
32
33
34
35
36
37
38
| .
├── build
├── mock
├── public
├── src
│ ├── api
│ ├── assets
│ ├── components
│ ├── styles
│ ├── directives
│ ├── enums
│ ├── hooks
│ │ ├── component
│ │ ├── core
│ │ ├── event
│ │ ├── setting
│ │ └── web
│ ├── layouts
│ │ ├── default
│ │ ├── iframe
│ │ └── page
│ ├── locales
│ ├── logics
│ ├── main.ts
│ ├── router
│ ├── settings
│ │ ├── componentSetting.ts
│ │ ├── designSetting.ts
│ │ ├── encryptionSetting.ts
│ │ ├── localeSetting.ts
│ │ ├── projectSetting.ts
│ │ └── siteSetting.ts
│ ├── store
│ ├── utils
│ └── views
├── types
└── vite.config.ts
|
2.3 Vite 基础配置
在vite.config.js添加:
1
2
3
4
5
6
7
8
9
10
11
12
| server: {
port: 3000,
host: '0.0.0.0',
open: true,
cors: true,
proxy: {},
},
|
2.4 eslint 配置
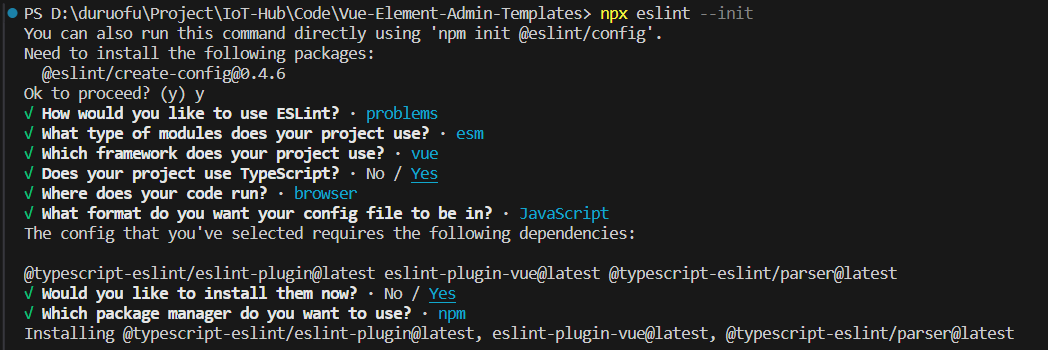
重新生成配置文件:

运行命令后会在根目录生成一个.eslintrc.cjs文件,其中的代码如下:
1
2
3
4
5
6
7
8
9
10
11
12
13
14
15
16
17
18
19
20
21
22
23
24
25
26
27
28
29
30
31
32
33
34
35
36
| module.exports = {
"env": {
"browser": true,
"es2021": true
},
"extends": [
"eslint:recommended",
"plugin:@typescript-eslint/recommended",
"plugin:vue/vue3-essential"
],
"overrides": [
{
"env": {
"node": true
},
"files": [
".eslintrc.{js,cjs}"
],
"parserOptions": {
"sourceType": "script"
}
}
],
"parserOptions": {
"ecmaVersion": "latest",
"parser": "@typescript-eslint/parser",
"sourceType": "module"
},
"plugins": [
"@typescript-eslint",
"vue"
],
"rules": {
}
}
|
完善rules:
1
2
3
4
5
6
7
8
9
10
11
12
13
14
15
16
17
18
19
20
21
22
23
24
| rules: {
'no-var': 'error',
'no-multiple-empty-lines': ['warn', { max: 1 }],
'no-console': process.env.NODE_ENV === 'production' ? 'error' : 'off',
'no-debugger': process.env.NODE_ENV === 'production' ? 'error' : 'off',
'no-unexpected-multiline': 'error',
'no-useless-escape': 'off',
'@typescript-eslint/no-unused-vars': 'error',
'@typescript-eslint/prefer-ts-expect-error': 'error',
'@typescript-eslint/no-explicit-any': 'off',
'@typescript-eslint/no-non-null-assertion': 'off',
'@typescript-eslint/no-namespace': 'off',
'@typescript-eslint/semi': 'off',
'vue/multi-word-component-names': 'off',
'vue/script-setup-uses-vars': 'error',
'vue/no-mutating-props': 'off',
'vue/attribute-hyphenation': 'off'
}
|
在项目根目录新建 .eslintignore 文件,并写入如下代码:
在 packjson.json 中 script 字段中添加俩行命令
1
2
| "lint": "eslint src",
"fix": "eslint src --fix"
|
2.5 prettier配置
在我们的项目中,eslint 应主要负责校验语法校验,prettier 应主要负责代码格式化
安装:
1
| install -D eslint-plugin-prettier prettier eslint-config-prettier
|
根目录下新建 .prettierrc.json 文件,并填入如下代码:
1
2
3
4
5
6
7
8
9
10
11
12
13
14
15
16
| {
"printWidth": 100,
"tabWidth": 2,
"useTabs": true,
"semi": false,
"singleQuote": true,
"trailingComma": "none",
"bracketSpacing": true,
"bracketSameLine": true,
"arrowParens": "always",
"htmlWhitespaceSensitivity": "ignore",
"vueIndentScriptAndStyle": false,
"endOfLine": "auto",
"singleAttributePerLine": false
}
|
说明:
1
2
3
4
5
6
7
8
9
10
11
12
13
14
15
| {
"printWidth": 100, //每行最多显示的字符数
"tabWidth": 2,//tab的宽度 2个字符
"useTabs": true,//使用tab代替空格
"semi": false,//结尾使用分号
"singleQuote": true,//使用单引号代替双引号
"trailingComma": "none",//结尾是否添加逗号
"bracketSpacing": true,//对象括号俩边是否用空格隔开
"bracketSameLine": true,;//组件最后的尖括号不另起一行
"arrowParens": "always",//箭头函数参数始终添加括号
"htmlWhitespaceSensitivity": "ignore",//html存在空格是不敏感的
"vueIndentScriptAndStyle": false,//vue 的script和style的内容是否缩进
"endOfLine": "auto",//行结尾形式 mac和linux是\n windows是\r\n
"singleAttributePerLine": false //组件或者标签的属性是否控制一行只显示一个属性
}
|
根目录下新建 .prettierignore 文件并填入如下代码:
1
2
3
4
5
6
7
| /dist/*
/html/*
.local
/node_modules/**
**
*.sh
/public/*
|
完善.eslintrc.cjs文件,加入prettier插件:
1
| 'plugin:prettier/recommended',
|
在 packjson.json 文件的script 字段中添加一行命令
1
| "format": "prettier --write \".*.{html,vue,js,ts,json,md}\" "
|
2.6 配置stylelint
stylelint 是 css 的格式化工具。可格式化css代码、检查css语法错误与不合理的写法,指定css书写顺序等
安装:
本项目中使用scss作为预处理器,安装以下依赖:
1
2
3
| npm install postcss@^8.4.33 postcss-html@^1.6.0 postcss-scss@^4.0.9 prettier@^3.2.4 sass@^1.69.7 sass-loader@^14.0.0 stylelint@^14.16.1 stylelint-config-prettier@^9.0.5 stylelint-config-recess-order@^3.1.0 stylelint-config-recommended-scss@^8.0.0 stylelint-config-standard@^28.0.0 stylelint-config-standard-scss@^6.1.0 stylelint-config-standard-vue@^1.0.0 stylelint-order@^6.0.4 stylelint-scss@^4.7.0 --save-dev
|
在项目根目录下新建 .stylelintrc.cjs,并填入如下代码:
1
2
3
4
5
6
7
8
9
10
11
12
13
14
15
16
17
18
19
20
21
22
23
24
25
26
27
28
29
30
31
32
33
34
35
36
37
38
39
40
41
42
43
44
45
46
47
48
49
50
51
52
| module.exports = {
extends: [
'stylelint-config-standard',
'stylelint-config-html/vue',
'stylelint-config-standard-scss',
'stylelint-config-recommended-vue/scss',
'stylelint-config-recess-order',
'stylelint-config-prettier',
],
overrides: [
{
files: ['**/*.(scss|css|vue|html)'],
customSyntax: 'postcss-scss',
},
{
files: ['**/*.(html|vue)'],
customSyntax: 'postcss-html',
},
],
ignoreFiles: [
'**/*.js',
'**/*.jsx',
'**/*.tsx',
'**/*.ts',
'**/*.json',
'**/*.md',
'**/*.yaml',
],
rules: {
'value-keyword-case': null,
'no-descending-specificity': null,
'function-url-quotes': 'always',
'no-empty-source': null,
'selector-class-pattern': null,
'property-no-unknown': null,
'block-opening-brace-space-before': 'always',
'value-no-vendor-prefix': null,
'property-no-vendor-prefix': null,
'selector-pseudo-class-no-unknown': [
true,
{
ignorePseudoClasses: ['global', 'v-deep', 'deep'],
},
],
},
}
|
在项目根目录下新建 .stylelintignore 文件,并填入如下代码:
1
2
3
4
| /node_modules/*
/dist/*
/html/*
/public/*
|
在 packjson.json 文件的 script 字段中添加命令
1
| "lint:style": "stylelint src*.{css,scss,vue} --cache --fix"
|
2.7 集成 husky 和 lint-staged
初始化husky:
安装lint-staged :npm i lint-staged -D
在 package.json 里增加 lint-staged 配置项:
1
2
3
4
5
6
7
8
9
10
11
12
13
14
15
16
17
18
19
20
21
22
23
| {
"lint-staged": {
"*.{js,jsx,ts,tsx}": [
"prettier --write",
"eslint --fix"
],
"*.vue": [
"prettier --write",
"eslint --fix",
"stylelint --fix"
],
"*.{html,vue,vss,sass,less}": [
"prettier --write",
"stylelint --fix"
],
"package.json": [
"prettier --write"
],
"*.md": [
"prettier --write"
]
},
}
|
修改 .husky/pre-commit 文件触发命令为:
2.8 配置commitlint,commitizen工具
集成 commitlint 验证规范提交,这样可以只让符合 Angular 规范的 commit message 通过
安装依赖:npm i @commitlint/cli @commitlint/config-conventional -D
添加.commitlintrc.json文件
1
2
3
4
5
6
7
| {
"extends": ["@commitlint/config-conventional"],
"rules": {
"scope-empty": [2, "never"]
}
}
|
使用 husky 命令在 .husky 目录下创建 commit-msg 文件,并在此执行验证命令:
1
| npx husky add .husky/commit-msg "npx --no-install commitlint --edit $1"
|
commitlint配置好了,下一步就是要引入commitizen来帮助我们便捷地创建符合commitlint规范的commit message
安装:npm i -D commitizen cz-conventional-changelog
安装好后,创建 .czrc 配置文件,并向文件中填入内容
1
| {"path":"cz-conventional-changelog"}
|
- cz-conventional-changelog是commitizen的 conventional-changelog 适配器,使用该适配器,commitizen将以AngularJS 的commit message规范逐步引导我们完成commit message的创建。
在package.json中新增脚本:cz
1
2
3
| "scripts": {
"cz": "cz"
}
|
使用脚本npm run cz即可执行commit message的创建
2.9 集成 Element Plus 组件库
安装依赖: npm install element-plus --save
全局引入:
1
2
3
4
5
6
7
8
9
10
11
12
13
14
15
16
17
18
|
import './assets/main.css'
import { createApp } from 'vue'
import { createPinia } from 'pinia'
import ElementPlus from 'element-plus'
import 'element-plus/dist/index.css'
import zhCn from 'element-plus/dist/locale/zh-cn.mjs'
import App from './App.vue'
import router from './router'
const app = createApp(App)
app.use(createPinia())
app.use(router)
app.use(ElementPlus, {
locale: zhCn
})
app.mount('#app')
|
注意这里会报错:
1
| 无法找到模块“[element-plus](https://so.csdn.net/so/search?q=element-plus&spm=1001.2101.3001.7020)/dist/locale/zh-cn.mjs”的声明文件。
|
需要在env.d.ts里加上一行:
declare module "element-plus/dist/locale/zh-cn.mjs";
然后在 tsconfig.json 中通过 compilerOptions.type 指定全局组件类型
1
2
3
4
5
6
7
|
{
"compilerOptions": {
"types": ["element-plus/global"]
}
}
|
2.10 安装mitt,用于全局事件通信
安装:npm i mitt
utils下新建mitt.ts
1
2
3
4
|
import mitt from 'mitt'
export const bus = mitt()
|
2.11 安装axios,封装HTTP请求
安装:npm install axios
utils下新http.ts封装axios:
1
2
3
4
5
6
7
8
9
10
11
12
13
14
15
16
17
18
19
20
21
22
23
24
25
26
27
28
29
30
31
32
33
34
35
36
37
38
39
40
| import axios from 'axios'
const instance = axios.create({
baseURL: 'http://127.0.0.1:8000',
timeout: 6000,
headers: { 'Content-Type': 'application/x-www-form-urlencoded' }
})
axios.interceptors.request.use(
function (config) {
return config
},
function (error) {
return Promise.reject(error)
}
)
axios.interceptors.response.use(
function (response) {
return response
},
function (error) {
return Promise.reject(error)
}
)
export default instance
|
2.12 安装Apache ECharts
安装:npm install echarts --save
2.13 ENV环境变量的配置
项目开发过程中,至少会经历开发环境、测试环境和生产环境(即正式环境)三个阶段。不同阶段请求的状态(如接口地址等)不尽相同,若手动切换接口地址是相当繁琐且易出错的。于是环境变量配置的需求就应运而生,我们只需做简单的配置,把环境状态切换的工作交给代码。
开发环境(development)
顾名思义,开发使用的环境,每位开发人员在自己的dev分支上干活,开发到一定程度,同事会合并代码,进行联调。
测试环境(testing)
测试同事干活的环境啦,一般会由测试同事自己来部署,然后在此环境进行测试
生产环境(production)
生产环境是指正式提供对外服务的,一般会关掉错误报告,打开错误日志。(正式提供给客户使用的环境。)
注意:一般情况下,一个环境对应一台服务器,也有的公司开发与测试环境是一台服务器!!!
项目根目录分别添加 开发、生产和测试环境的文件!
1
2
3
| .env.development
.env.production
.env.test
|
文件内容
1
2
3
4
|
NODE_ENV = 'development'
VITE_APP_TITLE = '硅谷甄选运营平台'
VITE_APP_BASE_API = '/dev-api'
|
1
2
3
| NODE_ENV = 'production'
VITE_APP_TITLE = '硅谷甄选运营平台'
VITE_APP_BASE_API = '/prod-api'
|
1
2
3
4
|
NODE_ENV = 'test'
VITE_APP_TITLE = '硅谷甄选运营平台'
VITE_APP_BASE_API = '/test-api'
|
配置运行命令:package.json
1
2
3
4
5
6
| "scripts": {
"dev": "vite --open",
"build:test": "vue-tsc && vite build --mode test",
"build:pro": "vue-tsc && vite build --mode production",
"preview": "vite preview"
},
|
通过import.meta.env获取环境变量
2.14 SVG图标配置
在开发项目的时候经常会用到svg矢量图,而且我们使用SVG以后,页面上加载的不再是图片资源,
这对页面性能来说是个很大的提升,而且我们SVG文件比img要小的很多,放在项目中几乎不占用资源。
安装SVG依赖插件
1
| npm install vite-plugin-svg-icons -D
|
在vite.config.ts中配置插件
1
2
3
4
5
6
7
8
9
10
11
12
13
14
| import { createSvgIconsPlugin } from 'vite-plugin-svg-icons'
import path from 'path'
export default () => {
return {
plugins: [
createSvgIconsPlugin({
iconDirs: [path.resolve(process.cwd(), 'src/assets/icons')],
symbolId: 'icon-[dir]-[name]',
}),
],
}
}
|
入口文件导入
1
| import 'virtual:svg-icons-register'
|
svg封装为全局组件
因为项目很多模块需要使用图标,因此把它封装为全局组件!!!
在src/components目录下创建一个SvgIcon组件:代表如下
1
2
3
4
5
6
7
8
9
10
11
12
13
14
15
16
17
18
19
20
21
22
23
24
25
26
27
28
29
30
31
32
33
34
35
36
| <template>
<div>
<svg :style="{ width: width, height: height }">
<use :xlink:href="prefix + name" :fill="color"></use>
</svg>
</div>
</template>
<script setup lang="ts">
defineProps({
prefix: {
type: String,
default: '#icon-'
},
name: String,
color: {
type: String,
default: ""
},
width: {
type: String,
default: '16px'
},
height: {
type: String,
default: '16px'
}
})
</script>
<style scoped></style>
|
在components文件夹目录下创建一个index.ts文件:用于注册components文件夹内部全部全局组件!!!
1
2
3
4
5
6
7
8
9
10
| import SvgIcon from './SvgIcon/index.vue';
import type { App, Component } from 'vue';
const components: { [name: string]: Component } = { SvgIcon };
export default {
install(app: App) {
Object.keys(components).forEach((key: string) => {
app.component(key, components[key]);
})
}
}
|
在入口文件引入src/index.ts文件,通过app.use方法安装自定义插件
1
2
| import gloablComponent from './components/index';
app.use(gloablComponent);
|
2.15 集成sass
我们目前在组件内部已经可以使用scss样式,因为在配置styleLint工具的时候,项目当中已经安装过sass sass-loader,因此我们再组件内可以使用scss语法!!!需要加上lang=”scss”
1
| <style scoped lang="scss"></style>
|
接下来我们为项目添加一些全局的样式
在src/styles目录下创建一个index.scss文件,当然项目中需要用到清除默认样式,因此在index.scss引入reset.scss
在入口文件引入
但是你会发现在src/styles/index.scss全局样式文件中没有办法使用$变量.因此需要给项目中引入全局变量$.
在style/variable.scss创建一个variable.scss文件!
在vite.config.ts文件配置如下:
1
2
3
4
5
6
7
8
9
10
11
| export default defineConfig((config) => {
css: {
preprocessorOptions: {
scss: {
javascriptEnabled: true,
additionalData: '@import "./src/styles/variable.scss";',
},
},
},
}
}
|
@import "./src/styles/variable.less";后面的;不要忘记,不然会报错!
配置完毕你会发现scss提供这些全局变量可以在组件样式中使用了!!!
2.16 mock数据
安装依赖:https://www.npmjs.com/package/vite-plugin-mock
1
| pnpm install -D vite-plugin-mock mockjs
|
在 vite.config.js 配置文件启用插件。
1
2
3
4
5
6
7
8
9
10
11
12
13
| import { UserConfigExport, ConfigEnv } from 'vite'
import { viteMockServe } from 'vite-plugin-mock'
import vue from '@vitejs/plugin-vue'
export default ({ command })=> {
return {
plugins: [
vue(),
viteMockServe({
enabled: command === 'serve',
}),
],
}
}
|
在根目录创建mock文件夹:去创建我们需要mock数据与接口!!!
在mock文件夹内部创建一个user.ts文件
1
2
3
4
5
6
7
8
9
10
11
12
13
14
15
16
17
18
19
20
21
22
23
24
25
26
27
28
29
30
31
32
33
34
35
36
37
38
39
40
41
42
43
44
45
46
47
48
49
50
51
52
53
54
55
56
57
58
59
60
61
62
63
64
65
66
67
68
69
|
function createUserList() {
return [
{
userId: 1,
avatar:
'https://wpimg.wallstcn.com/f778738c-e4f8-4870-b634-56703b4acafe.gif',
username: 'admin',
password: '111111',
desc: '平台管理员',
roles: ['平台管理员'],
buttons: ['cuser.detail'],
routes: ['home'],
token: 'Admin Token',
},
{
userId: 2,
avatar:
'https://wpimg.wallstcn.com/f778738c-e4f8-4870-b634-56703b4acafe.gif',
username: 'system',
password: '111111',
desc: '系统管理员',
roles: ['系统管理员'],
buttons: ['cuser.detail', 'cuser.user'],
routes: ['home'],
token: 'System Token',
},
]
}
export default [
{
url: '/api/user/login',
method: 'post',
response: ({ body }) => {
const { username, password } = body;
const checkUser = createUserList().find(
(item) => item.username === username && item.password === password,
)
if (!checkUser) {
return { code: 201, data: { message: '账号或者密码不正确' } }
}
const { token } = checkUser
return { code: 200, data: { token } }
},
},
{
url: '/api/user/info',
method: 'get',
response: (request) => {
const token = request.headers.token;
const checkUser = createUserList().find((item) => item.token === token)
if (!checkUser) {
return { code: 201, data: { message: '获取用户信息失败' } }
}
return { code: 200, data: {checkUser} }
},
},
]
|
参考链接
- https://juejin.cn/post/7156957907890733063#heading-1
- https://yiming_chang.gitee.io/pure-admin-doc/pages/directory/

